2010.05.30xoopsズープス
ギガレンタルサーバーにxoopsをインストール 手順
ドメインの取得
ギガレンタルサーバの管理画面 cPanel X サブドメイン設定。
1.サブドメインのアイコンをクリック
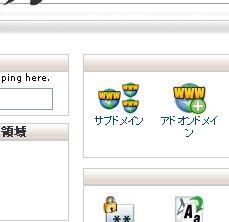
2.取得したドメインを ギガレンタルサーバで利用できるように cPanel X で設定
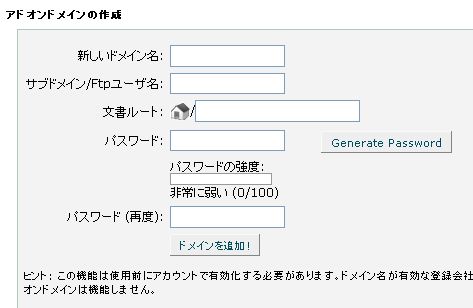
(文書ルートはとくに入力する必要はありません。)
ドメインを設定する前に、ネームサーバーの変更が必要です。
ネームサーバーの変更方法は、ドメインを取得したサービスをご確認ください。
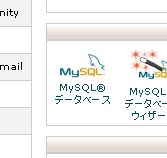
3.cPanel Xのトップへ戻り、[MySQLデータベース」アイコンをクリックします。
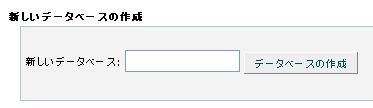
4.任意のデータベース名を記入し、データベースを作成します。
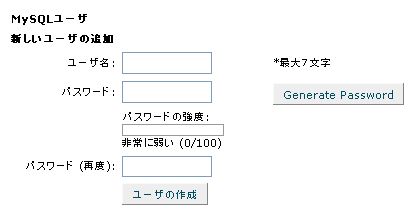
5.任意のデータベースユーザー名を記入し、データベースユーザーを作成します。
6.先程作成したデータベースに、作成したデータベースユーザーを割り当てます。
mysqlユーザーの作成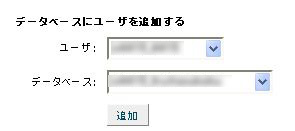
cPanel X での設定は以上です。次はxoopsをアップロードして設定しましょう。
でコントロールパネルで
xoopsのダウンロード
http://xoopscube.jp/
(今回はXOOPS Cube Legacy 2.1.8)


-
 whois ansi のCreation Date Registration Date Expiry Date とは
(
xoopsズープス
)
[40701 view]
2011年09月23日
whois ansi のCreation Date Registration Date Expiry Date とは
(
xoopsズープス
)
[40701 view]
2011年09月23日
-
xxoops2.2.0でaltsysをインストールした後、エラーが出て、altsysモジュールが白紙のときの対処法
(
xoopsズープス
)
[34723 view]
2011年12月03日
-
bulletinモジュールの投稿者名とヒット数とコメント数を消す。 bulletin_item.html
(
xoopsズープス
)
[34242 view]
2010年06月20日
-
リストタグで横並びにして、かつ、フロート(回り込み)を解除する方法(崩れる 対処法)
(
xoopsズープス
)
[32597 view]
2011年04月05日
-
xoops2.2.0でaltsysをインストールした後、ブロック部分と管理ページの日付が文字化けしたときの対処法
(
xoopsズープス
)
[32062 view]
2011年07月23日
-
「ページを開けません。サーバーが応答を停止しています。」の問題について
(
xoopsズープス
)
[32008 view]
2012年09月19日
-
light box 2.04 close.gif loading.gifが表示されない lightbox.js
(
xoopsズープス
)
[31207 view]
2010年06月21日
-
Picoモジュールの 「コンテンツ内容」ブロックを利用して、スマーティーを利用できるカスタムブロックを実現する方法
(
xoopsズープス
)
[30456 view]
2011年07月29日
-
Smartyにtruncateという文字列修正の関数がある。指定した文字数で文字列を切り捨てるという便利なものなのだが、マルチバイト文字列に対してこれを使うと文字化けが起こって...
(
xoopsズープス
)
[29519 view]
2011年04月04日
-
モジュールUTF8化
(
xoopsズープス
)
[28824 view]
2010年03月30日


